Details
| Surface Treatment |
Anodized |
Material |
Aluminum Alloy 6005-T5 |
| Place of Origin |
China |
Installation Site |
Open Field |
| Brand Name |
Exten |
Model Number |
A02-1 |
| Standard |
|
Certificate |
AS/NZS1170.2/CE/ISO |
| Wind Load |
60m/s(196.85ft/s) |
Module Orientation |
Landscape Portrait |
| Wind speed |
Yo 60m/s |
Max Snow Load |
1.4KN/m2 |
| Snow Load |
1.4KN/m2(29.24psf) |
Service Life |
25YRS |
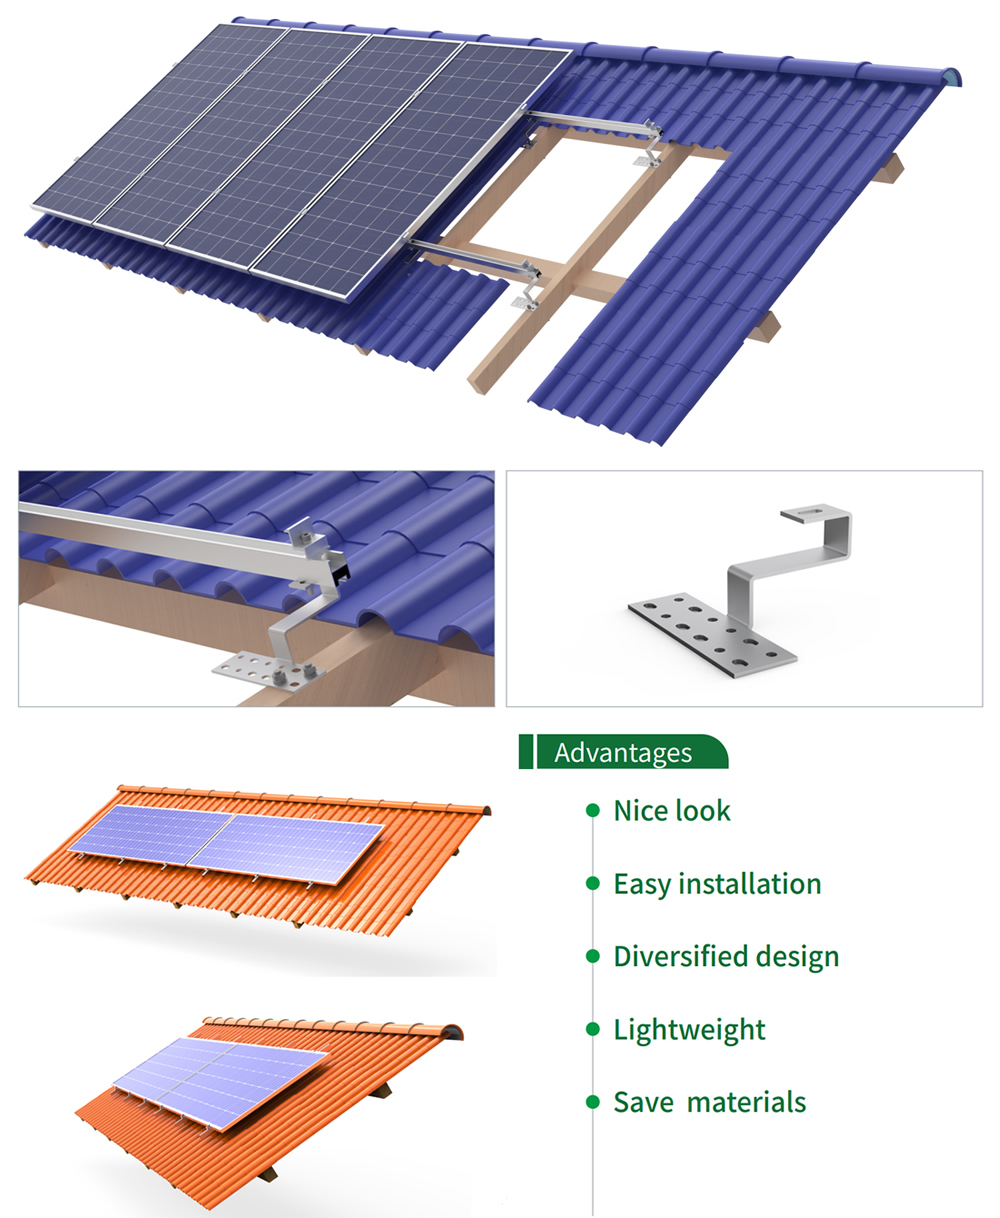
What is Tile Roof Solar Mounting System?Solar panel tile roof mounting kit is a specialized structural system designed to install photovoltaic modules on sloped roofs covered with glazed tiles (i.e., curved or S-shaped clay tiles). This type of roof is commonly found on villas, high-end residences, and certain public buildings. While it is aesthetically pleasing and highly durable, the tiles themselves are brittle, and traditional drilling methods can easily cause tile cracks and roof leaks.
To address this, engineers have developed a hook-mounted installation solution that secures the mounting system using stainless steel hooks through the gaps between tiles or to the underlying structure—without penetrating the tile surface—thereby fundamentally preserving the roof’s integrity and waterproofing performance.
Tile Roof Mount Advantages
The advantages of this system are evident across multiple dimensions, each of which directly impacts the project’s safety, reliability, and long-term operational benefits.
1, roof integrity is fully preserved. The hook-based installation method does not penetrate the glazed tiles at all—no drilling, no nailing, and no damage to the tile’s glazed surface. Glazed tiles will fracture when bending stress exceeds approximately 300 to 400 newtons; the hook-based solution transfers the load directly to the roof structural layer, preventing the tiles from bearing additional stress and thereby eliminating the risk of cracking. This is crucial—once tiles are damaged, rainwater seeping into the insulation layer can cause structural corrosion, resulting in extremely high repair costs.
2, the system offers reliable waterproofing performance. During installation, specialized sealant is applied at the points where the hooks contact the roof, ensuring that rainwater cannot seep in along the hooks. For pitched roofs, the tiles themselves serve as the primary waterproofing barrier, and the non-penetrating installation method preserves the integrity of this barrier at its source.
3, the structural design is flexible. There are specially designed hooks for different types of glazed tiles—such as Spanish tiles (S-shaped tiles), Roman tiles (barrel tiles), and flat tiles—and the hook height can be adjusted according to the actual thickness of the tile type. The system is typically suitable for roof slopes ranging from 5 to 45 degrees. This flexible adaptability allows a single mounting system to cover the vast majority of glazed tile roofing projects.
4, installation is efficient and controllable. Both the hooks and the rail system feature a modular design, with key connectors pre-assembled at the factory. On-site installation requires only three steps: installing the hooks, laying the rails, and securing the components. Compared to solutions that require drilling holes in the roof or pouring foundations, the construction timeline can be significantly shortened, meaning less construction disruption for property owners.
5, long-term durability is guaranteed. The main structure of the mounting system is typically made of high-strength 6063-T5 or 6005-T6 aluminum alloy, with a surface treated by anodization to provide excellent corrosion resistance and a design service life of over 25 years. All fasteners are made of 304 stainless steel, eliminating the risk of rust.
Overall, the glazed tile roof solar mount strikes a good balance between safety, waterproofing, flexibility, and durability, and has become the standard configuration for distributed PV projects on pitched roofs of high-end residential and public buildings.
Solar Panel Mounts for Tile Roof Installation
Step 1: Site Survey and Design. Engineers must verify the type of roof tiles, the structural load capacity, and the roof orientation, and then develop a mounting bracket layout and module array plan based on local wind pressure data.
Step 2: Clamp Installation. Installers place specialized clamps at the crests of the color-coated steel roof panels according to the drawings and tighten them to the specified torque using a torque wrench. The clamps must fit snugly against the corrugations; no drilling or penetration of the roof is permitted throughout the process.
Step 3: Rail Installation. Aluminum alloy rails are secured to the clamps using connectors to form parallel support tracks. A level is used to calibrate the installation, ensuring the entire frame is level and that the rail spacing matches the module width.
Step 4: Module Installation. Photovoltaic modules are hoisted onto the rails one by one and secured using pressure blocks or clips, ensuring that expansion gaps are left between adjacent modules to accommodate thermal expansion and contraction.
Step 5: Electrical Connection and Acceptance. Complete the string wiring and grounding system installation, test the open-circuit voltage and polarity, and finally verify the torque of all fasteners. Clean up the site and submit the acceptance record. The entire process is highly modular and allows for rapid construction; a skilled team can complete small- to medium-sized commercial and industrial rooftop projects within a few days.
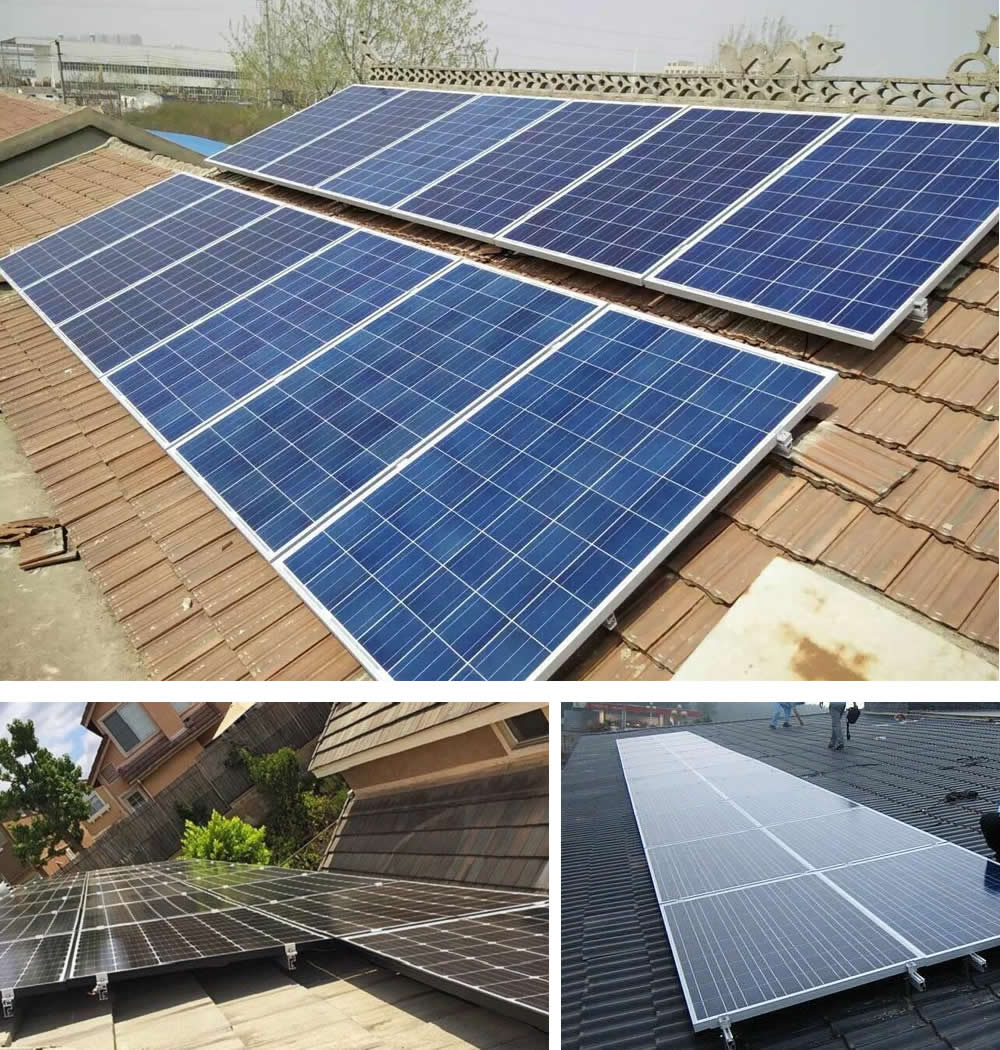
Tile Roof Solar Mounting System Case
FAQ
Q1: Will installing the hooks damage the glazed roof tiles?
No. This is the core design principle of the system. The hooks are secured to the roof structure beneath the tiles, rather than clamping or pressing down on the tiles themselves. During installation, technicians carefully lift some tiles to secure the hooks to the wooden purlins or concrete roof deck, then replace the tiles. Throughout the process, a gap of at least 5 millimeters is maintained between the hooks and the tiles to ensure the tiles are not subjected to any external pressure. In special cases where tiles need to be cut (such as barrel tiles), it is recommended to use a wet diamond saw to prevent the propagation of micro-cracks caused by dry cutting.
Q2: Will the installation damage the roof’s waterproofing layer?
A professional installation will not damage the waterproofing layer. The actual waterproofing layer for a glazed tile roof is the waterproof membrane or coating beneath the tiles. During hook installation, specialized waterproof gaskets or sealant are applied where the hooks pass through the gaps between tiles, and the connection points between the hooks and the roof structure are sealed. All points where the waterproofing layer is penetrated undergo a three-layer waterproofing process (base sealing, intermediate gasket, and surface covering) to ensure that rainwater cannot seep through.
Q3: How long will these mounting brackets last? Is the material corrosion-resistant?
A high-quality system typically has a design life of over 25 years, matching the service life of the photovoltaic modules. The main body of the mounting system is made of 6063-T5 aluminum alloy with an anodized surface (typically 10 to 15 micrometers thick), providing excellent weather resistance and corrosion resistance. All fasteners, such as screws and washers, are made of 304 stainless steel. This system maintains long-term stability even in humid coastal environments or industrial areas with acidic or alkaline corrosion.
Q4: How fast is the installation? Is the installation process complicated?
Installation is relatively fast. Since the hooks, rails, and connectors are all standardized, modular products, most components are pre-assembled before leaving the factory. The on-site installation process is straightforward: first, mark the hook positions on the roof according to the design drawings; secure the hooks to the roof structure; then lay the aluminum alloy rails; and finally, install the modules and lock them in place with clamps. Installation of the mounting system on a typical residential roof can usually be completed within 1 to 2 days; a skilled team can work even faster.
Q5: Is it easy to perform maintenance and replace components later on?
It is very easy. The system features a modular, removable design, and all connectors are standard specifications. If a faulty component needs to be replaced, simply loosen the clamps or latches at the corresponding location, remove the old component, install the new one, and secure it. The entire process does not require removing the rails or hooks and can be performed by a single person. If extensive roof repairs or renovations are needed in the future, the mounting system can be completely dismantled and reinstalled, and most materials and components can be reused.


